Code coverage from manual/automated testing of asp.net web sites, application


This article explains how to get code coverage from asp.net website, web application , web service, stanalone executable etc..

Table of contents

    • Introduction
    • Code coverage steps
      • compiling website
      • instrumenting all dlls or executable
      • start vsperfcmd
      • run application
      • stop application
      • stop vsperfcmd
      • convert code coverage file to xml
      • use report generator to get html formatted report
    • Automating the code coverage process via batch script
    • Conclusion
    • History

Introduction

Here is the definition of code coverage (courtesy – wikipedia)
In computer science, code coverage is a measure used to describe the degree to which the source code of a program is executed when a particular test suite runs. A program with high code coverage, measured as a percentage, has had more of its source code executed during testing which suggests it has a lower chance of containing undetected software bugs compared to a program with low code coverage.Many different metrics can be used to calculate code coverage; some of the most basic are the percent of program subroutines and the percent of program statements called during execution of the test suite.

In my earlier project, we used to write unit testcases and get code coverage out of that. But for legacy project, we found it hard to write unit testcases as we have to refactor the code which is time consuming task. So we decided to set up a process, that gets us code coverage from manual or automated testing of website.

Here is the detailed explanation of steps.

Code coverage implementations.

Here, I will explain , how to get code coverage for asp.net website and stanalone executable. I have chosen asp.net website instead of web application, because

  • in earlier project we had website, and we have not migrated that to web application.
  • in case of web application, we already have dlls, so it is easier to get code coverage (saves one step of the whole process)

For asp.net website, we will only have .aspx and aspx.cs or aspx.vb files along with .config file. If you have any project reference, you will also have bin folder with dlls inside.

For sake of understanding, I have taken an example of website. This is a simple calculator website and standalone executable. Which takes 3 input, operator, 2 inputs and calculates value.

It has 3 projects.

  • CalcDLL“, this is a library project. Which has logic of calculating the value from inputs. It has one public function “Calculate” which takes operator and its constructor takes 2 input. “Calculate” function returns result.
  • A website (“CalculateWebsite“), what has 2 textboxes and a dropdownlist. This takes input from user and calculates value. It has project reference of CalcDLL. It has a publishing profile, which simply copies file to a separate location. Here it points to “C:\demo\” .
  • A console project (“CalcConsole“), which takes 3 command line argument. E.g. “CalcConsole.exe + 1 1″, output will be Result = 2. This is self explanatory.


Note:

  • This project can be testable via unit testing. I have skipped this, because, this article demonstrates code coverage via auto or manual testing of app (sort of functional testing).
  •  I have set paths of every tool required in my environment variable, that is why I can execute those command directly.

Pre steps for getting DLLs and EXEs.

Website

For website, first, we need to publish to local directory. Since it will not copy “.pdb” files of dependent project reference, we need to manually copy that file from bin folder of website project (location – \CalculateWebsite\bin\Calc.pdb) to published dir (C:\demo\bin).

Here is the screenshot of the website.
z2n4dqh

Compiling website:

For website, we will have only “.aspx.cs” and “.aspx” files, and since instrumentation works on only dll or exe, we need to convert the web site to web application or we need to precompile the project. Here is the command to do so.

aspnet_compiler -p %original_dir% -v / %compiled_dir% -d
  • -p is for physical path
  • -v for virtual directory
  • -d is for debug version.

Here is the screenshot of website, after compiling.
x4nmvl6

This command will generate a dll with name similar to this – App_Web_m55qrtmf.dll . And it will have only “aspx” file and config file. Because it compiled .aspx.cs file to that dll.

Here is the screenshot .

vmne3py

For console project
For console, we need to build in debug mode.

Note: When we go for code coverage, we always need to have debug version of project. Instrumentation process needs DDL and PDB files.

Instrumenting dlls:

Here is the command to instrument.

vsinstr /coverage 

Location for vsinstr.exe is “C:\Program Files (x86)\Microsoft Visual Studio 12.0\Team Tools\Performance Tools” . You can set PATH variable of your system to run this command directly. “vsinstr” stands for visual studio instrumentation tool.

Since I have VS 2013, path of vsinstr is above, for you can try replacing 12.0 with your versions.

For websites or app, we may have multiple dlls, so we need to do that for all dlls.

In case of console project, following is the exact command.

vsinstr /coverage Calc.dll
vsinstr /coverage CalcConsole.exe

In case of website, we need to execute following command.

vsinstr /coverage C:\demo\compiled\bin\Calc.dll
vsinstr /coverage C:\demo\compiled\bin\App_Web_m55qrtmf.dll

Here is the screenshot of vsinstr output.

pqw3igk

When you run vsinstr, it will add hooks to functions, conditional block etc.., and that is why dll and exe size will increase. It will keep a back of those file with “.orig” extension.

Here is the screenshot of files after running vsinstr . If you compare with previous, you can see that dll and exe size has grown.

x6yjr2w

Start vsperfcmd:

Next, we will start vsperfcmd. “vsperfcmd” stand for visual studio performance command line tool. Following is the command to run vsperfcmd. Location for vsperfcmd is same as vsinstr. If you set path in environment variable, it will be easier to execute them.

vsperfcmd /start:coverage /output:C:\demo\compiled\demo.coverage.
  • /start:coverage – we are telling to start in coverage mode.
  • /output – location of .coverage file.

Here is the screenshot of output.

gqufoyw

Running the application:

For console project, you can start testing directly from command line. E.g. say we want to test “+” and “-“. Then use following command to test.

"CalcConsole.exe + 2 5" .

Here “CalcConsole.exe” is the output of CalcConsole console project. You need to launch exe from this location – “\CalcConsole\bin\debug\CalcConsole.exe“.
For website project, you need to start IISExpress and run the website from there and start testing manually. I have set path of IISExpress (C:\Program Files\IIS Express\) in my enviroment. Following is the command to run the IISExpress.

iisexpress /path:C:\demo\compiled\ /port:8888 /clr:v4.0
  • /path – physical path to website location
  • /port – port to listen.
  • /clr – clr version to use.

Here is the output of command. To stop IISExpress, you need to press “q” .

gfpk5qv

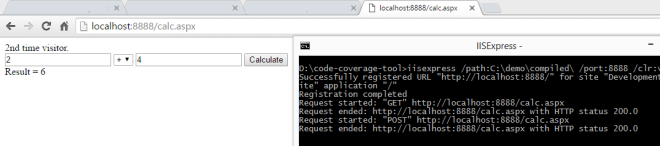
As you can see, I have tested only “+” operator. There is only a POST request.

stop application:

For website, press “q” to stop web server.

For console project, just stop testing 🙂 .

stop vsperfcmd:

Now, we need to stop vsperfcmd. Here is the command to do that.

vsperfcmd /shutdown

This will collect statistic about testing and generate “demo.coverage” file, the name we have at start of coverage process.

Here is the screenshot for this.

ysxyc9f

convert code coverage file to xml:

This coverage file can be opened in ultimate or premium edition of visual studio. Here is the screenshot for this.

dr6jde7

To skip this step, you can use VS (with required versions), and export to xml version of file. This coverage file is a binary file, so it need to be converted to readable format to get nicely looking html report.

Or you can use following code snippet to covert to XML file.

 // args[0] - input path of demo.coverage file
 // args[1] - output directory for converted xml file
 string wspath = args[1] + "coverage.xml";
 CoverageInfo coverage = CoverageInfo.CreateFromFile(args[0]);
 DataSet data = coverage.BuildDataSet(null);
 data.WriteXml(wspath );
 data.Dispose();
 coverage.Dispose();

Here you need DLL dependency of “Microsoft.VisualStudio.Coverage.Analysis.dll” which is part of Visual studio* . Location for those dependent dlls is “C:\Program Files (x86)\Microsoft Visual Studio 12.0\Common7\IDE\PrivateAssemblies

* – again those are part of required vs version, stated above.

I have written a simple utility using above codebase, which converts to xml file. Here is the command to execute that.

coveragereport C:\demo\compiled\demo.coverage C:\demo\compiled\

This will create “coverage.xml” file there.

HTML report generator:

For this you need an open source tool “ReportGenerator” . This will convert the xml report to nicely looking html report. Here is the command to execute.

reportgenerator -reports:C:\demo\compiled\coverage.xml -targetdir:C:\demo\compiled\report

Here is the screenshot for this.

nwgccrc

If you check the directory, it has created html file for reports in “C:\demo\compiled\report“. You can check, the report by opening html file (index.htm).

Now, you can see “SumEvaluator” has 100% coverage.

Here is the screenshot of html file.

ri6jznt

Automating the code coverage process via batch script:

To automate this process, I have created a batch file “start-coverage.bat” which takes one input, path of website. It will take input of website location and calculate code coverage. You just have execute batch file like this.

Assumption: Required path has been set up in executing system environment variable. “vsinstr”,”vsperfcmd”,”coverage_to_xml_tool”,”reportgenerator” path need to be set in environment variable.

start-coverage.bat C:\demo

Conclusion

This process will simplify getting coverage report from functional testing, be it manual or automatic. Batch file will make easier to get it done. Only manual step here is to copy the pdb file to published location.

Here is the link for code location. This contains source code for 3 projects + 1 project ( tool to convert coverage file to xml file).

History

I have tried many helpful suggestions from microsoft MSDN link to achive this. Following are few of them.

  • deploying the website to IIS server and using “vsperfclrenv /globaltraceon” to start getting coverage.
  • attach w3wp to vsperfmon.
  • use vsperfreport to get vsp file and then convert.

But unfortunately none of them worked for me. That encouraged to write me this blog and help other who are looking for it.

References

Code coverage from manual/automated testing of asp.net web sites, application

Extending and Overriding Magento Community extension

Magento provides option to develop extension, which can extend core features and perform some custom operations. This enables third party vendor to develop extension and distribute them on Magento Marketplace, they might have some price as well.

When we install those extension, we also look for way to update the extension, whenever there is an update available for the extension. At the same time, we also need to customize the community extension to meet our requirement or may be extend or override that extension functionalities.

To achieve this, we have 2 ways. Following are those.
1. Directly change the source of community extension. This has following pros and cons.
Pros
– Easier to implement changes. Meaning simply changes community extension source code.
    Cons
– Migration of extension will be difficult. Whenever there is an update for extension and you are up for it, you have to list down code changes and make those in new one.
2. Extend the community extension and build a local module.
    Pros
– Migration will be easier. However if there is huge change (example given below), you still need to customize your local module.
        E.g.  If upgraded extension, has changes the old class name to new one, then you need to update that object name in local module.
Cons
– You have to follow a convention to build a local module that extend community extension. Once you learned it, it will be easier for nexttime.

Here it goes, how to build local module that extend community extension.

Assumption:

  • Say community extension is “Oldcommunity“. And new local module name is “Custom_Extn” that will extend “Oldcommunity“.
  • All file path given below are relative to [Magento_Root]/app/code.
  • When I did for real project, it has actual meaning, but I can’t disclose that here, and to make it pretty simple, here is the purpose of change.
  • Purpose for extending the extension:
    • Precondition – Oldcommunity has a Model (Demo) and it has a method, say “getData()” which takes param ( $key ) and if key=”sample”, then return “samplevalue”.
    • Expectation: If key = “new_sample”, then value would be “new_sample_value”
      Since magento is very sensitive to casing of words, please take care of that as well.

Step – 1 :
In config.xml file (/local/Custom/Extn/etc/config.xml), add following lines.

 
<modules>
  <Custom_Extn>
    <version>1.0.0</version>
    <depends>
      <Oldcommunity />
    </depends>
  </Custom_Extn>
</modules>

Step – 2 :
Extend the model. For this you need to specify the same in above config.xml file.

<global>
   <models>
      <extn>
         <class>Custom_Extn_Model</class>
      </extn>
      <oldcommunity>
         <rewrite>
            <demo>Custom_Extn_Model_Demo</demo>
         </rewrite>
      </oldcommunity>
   </models>
</global>

Step – 3:
Create Demo.php in /local/Custom/Extn/Model/Demo.php.

<?php
require_once(Mage::getModuleDir('Model','Oldcommunity') . DS . 'Model' . DS . 'Demo.php'); // need to include original file here
class Custom_Extn_Model_Demo extends Oldcommunity_Model_Demo {
   public function getData($key){
      if($key == "new_sample")
         return "new_sample_value"; // injected new functionality here
      else
         return parent::getData($key); // retained older one here
   }
}

You are done with extension, you can deploy and test by instantiating Oldcommunity‘s Model (Demo) and pass param as “new_sample”, and you should get “new_sample_value”.

Similarly you can extend and override Blocks, Controllers etc…

I hope, this explains how to extend community extension. If you face any issue or face problem while implementing this, please feel free to drop a comment here.

Extending and Overriding Magento Community extension

SEO Friendly URL Routing in ASP.Net

I have stumbled upon this while answering to this in stackoverflow. So thought of sharing how to do this asp.net webproject.

Expectation / End result :

  1. If you have Search.aspx file in project, it will automatically become SEO friendly, i.e. you can browse it like this  “/Search” instead of “/Search.aspx”.
  2. If you need to pass parameters to that page, say product name, then you can do that using “/Search/Kindle”  instead of “/Search.aspx?productname=Kindle”.

Steps to achieve this:

Step-1

Install “Microsoft.AspNet.FriendlyUrls” from nuget package.

Open package manager console – Help. Then type following –

Install-Package Microsoft.AspNet.FriendlyUrls

Step-2

Then it will automatically add following in RouteConfig.cs.

public static class RouteConfig
{
   public static void RegisterRoutes(RouteCollection routes)
   {
      var settings = new FriendlyUrlSettings();
      settings.AutoRedirectMode = RedirectMode.Permanent;
      routes.EnableFriendlyUrls(settings); 
    }
}

Step-3

Add a webform with name say “Search.aspx”. And now if you browser http://www.example.com/Search, it will hit “Search.aspx”.

Now you are done with making SEO friendly URLS.

More Customization

Part – 1

If you want to make Search.aspx  to be called as “Search-Product”, then you can do that using following.

routes.MapPageRoute("", "Search-Product", "~/Search.aspx");

You need to add this to RouteConfig.cs, just after “routes.Enable…”

Now, if you hit this url – http://www.example.com/search-product, it will hit search.aspx.

Part -2

Now, you may need to pass parameters to Search.aspx. Yes you can do that, use following line instead of above.

  routes.MapPageRoute("Find", "Search-product/{productname}", "~/Search.aspx");

To get value of productname in Search.aspx, use following “Page.RouteData.Values[“productname”]” in page_load or any other event in Search.aspx.

Example

I have created an example. Used code suggested above. Hit following url

Output in code

Hope, it works for all those following this blog.

SEO Friendly URL Routing in ASP.Net

Enabling CORS in WCF

Introduction

This is an intermediate example of WCF as REST based solution and enabling CORS access, so that this WCF service can be consumed from other domains without having cross-domain issues. I will explain more on CORS in latter section, so hold on , read through problem and solution. While developing this similar solution, I have faced issues, and did not find any helpful working Article/blog, so i am posting this. Hope this will be helpful.

Background

We develop WCF service as REST service and consume that using javascript and jquery calls. This is good to start with single page application or purely javascript based application. You will never face any issue as long as wcf service hosted domain remains same as the domain where you have consumer service. The issue arises when, you started allowing other companies to consume WCF service as REST service. For e.g. you have some reporting service and exposed as REST service. You have a web portal , where this is consumed. And since this purely REST based, you want to allow 3rd party companies to consumer REST based service and show same reporting in their website. NOTE: In this case, JS used to consume WCF service will be sitting at client’s domain, but WCF domain will be your domain. And this different domain will cause cross domain issue, i.e. WCF will throw error while invoking.

Using the code

Before jumping straight into code, I want to formally introduce what is REST and CORS issue.

Representational state transfer (REST) is an abstraction of the architecture of the World Wide Web; more precisely, REST is an architectural style consisting of a coordinated set of architectural constraints applied to components, connectors, and data elements, within a distributed hypermedia system. REST ignores the details of component implementation and protocol syntax in order to focus on the roles of components, the constraints upon their interaction with other components, and their interpretation of significant data elements.– http://en.wikipedia.org/wiki/Representational_state_transfer#Framework_implementations

Cross-origin resource sharing(CORS) User agents commonly apply same-origin restrictions to network requests. These restrictions prevent a client-side Web application running from one origin from obtaining data retrieved from another origin, and also limit unsafe HTTP requests that can be automatically launched toward destinations that differ from the running application’s origin. – http://www.w3.org/TR/cors/#introduction

In this example, I will use sample WCF service , that Visual studio provides. First, we will create a WCF REST service, which can accept POST request with parameter as an object. Write a simple JS based APP to consume that. And WCF service will simply return the some prefix + received object value. As we are mainly focusing to enable CORS, I have kept this very basic.

Then I will show you , where exactly error happens. After that, solution for overcoming CORS issue.

Step#1. Lets create a WCF service project, create service contract and operation contract as shown below.

[ServiceContract]
public interface IService1
{

    [OperationContract]
    [WebInvoke(UriTemplate = "/TestMethod", Method = "POST", BodyStyle = WebMessageBodyStyle.Bare, RequestFormat = WebMessageFormat.Json
      )]
    string TestMethod(CompositeType value);

}

Step#2 Definition of CompositeType is –

[DataContract]
public class CompositeType
{
    bool boolValue = true;
    string stringValue = "Hello ";

    [DataMember]
    public bool BoolValue
    {
        get { return boolValue; }
        set { boolValue = value; }
    }

    [DataMember]
    public string StringValue
    {
        get { return stringValue; }
        set { stringValue = value; }
    }
}

Step#3 Then, create service class. Following is the code for this.

public class Service1 : IService1

{
    public string TestMethod(CompositeType value)
    {
        return string.Format("You entered: {0}", value.StringValue);
    }
}

Step#4 Assume it is hosted somewhere ( http://www.example1.com ) and test with fiddler whether it works. Following is the result.

1

Hurray!, it is working fine, see Result – 200 status.

Step#5 I have a simple javascript ( this will be in a HTML file) to invoke this REST based method.  The html file is hosted in – http://localhost Source code for javascript part in html file.

$(document).ready(function () {
	$("button").click(function () {
		alert("clicked");
		var data = $("#txt").val();
		var postdata = {};
		var data_obj = {"BoolValue" : "true" , "StringValue": data}
		postdata["value"] =  data_obj; 

		var url = "https://www.example.com/testwcf/service1.svc/TestMethod";
		$.ajax({
			type: "POST",
			url: url,
			contentType: "application/json; charset=utf-8",
			data: JSON.stringify(postdata),
			dataType: "json",
			success: function(data) {console.log(data);},
			error: function(a,b,c) {console.log(a);}
		});
	});
});

—————–HTML Part————-

Enter something <input id="txt" type="text" /><button>Get WCF data</button>

Now, when i execute this javascript it will throw error. Following is the error message from browser console.

OPTIONS https://www.example.com/wcfv1/service1.svc/TestMethod   test1.html:1
XMLHttpRequest cannot load https://www.example1.com/wcfv1/service1.svc/TestMethod. No 'Access-Control-Allow-Origin' header is present on the requested resource. Origin 'http://localhost' is therefore not allowed access. The response had HTTP status code 405.

Following is the browser request payload info.

2

And it is not working anymore with other domain javascript call Frown | :( .

If you closely look into this – we are invoking WCF with “POST” request , but it shows request method as “OPTIONS”. This is because, POST, PUT, DELETE methods are unsafe methods and cross domain requests first makes a preflight request i.e. OPTIONS request to see if that succeeds means server responds/sends OK signal to that , then only it will again make actual POST request.

Also, note that it sends various request headers such as “Access-Control-Request-Headers”, “Access-Control-Request-Method”.

What it means? –  We as wcf service developer need to responds to that OPTIONS htttp request.

How to do that? –  Add global.asax file and add following code to Application_BeginRequest. Following is the code snippet.

protected void Application_BeginRequest(object sender, EventArgs e)
{
    HttpContext.Current.Response.AddHeader("Access-Control-Allow-Origin", "http://localhost);
    if (HttpContext.Current.Request.HttpMethod == "OPTIONS")
    {
        HttpContext.Current.Response.AddHeader("Access-Control-Allow-Methods", "POST, PUT, DELETE");

        HttpContext.Current.Response.AddHeader("Access-Control-Allow-Headers", "Content-Type, Accept");
        HttpContext.Current.Response.AddHeader("Access-Control-Max-Age", "1728000");
        HttpContext.Current.Response.End();
    }
}

As you can see from above, i am allowing origin to “http://localhost&#8221;, so that if javascript is placed in this domain and that is making call to WCF, then it will be allowed. Also i have added request response header that we should send as part of OPTIONS Request header.

This is extremely important decision :  You can always use “*” for Access-Control-Allow-Origin, but for security reason that is discouraged. Because you are opening access to all to invoke your WCF server as REST Service from anywhere. Whereas you should know, to whom you are providing access for CORS and put those domains here only.

This is basic thing i am doing here, you can make those thing configurable.

So we are done with this setup, and i am going to deploy this solution, see if that helps.

Conclusion :

Now, i am using same javascript as above , and just hosted changed WCF code into some other virtual directory(testwcf). So when i issue ajax request, see that it has made 2 requests – OPTIONS, POST. Refer below screenshot.

3

We will analyse both request details, so first, see what is OPTIONS request’s response and how that is different from 1st attempt with non-CORS WCF.

4

As you can see that, now our WCF service responded with all required response headers such as “access-control-allow-* ” . – Note: we have done these in global.asax.

So when this request succeed , then browser made 2nd request i.e. actual POST . Lets check the details of that.

5

Now, you can see that, it actually made request payload and see that response header ( see Status code- 200 OK), it succeed and has some content-length.

Points of Interest

If you find it interesting and have some suggestion , put a comment , am i ready to interact with you.

Download source code here.

Enabling CORS in WCF

Azure Mobile Service with Pusher integration (Real Time APP)

Azure Mobile Service: (here after refer as AMS) provides ready to use service for building mobile apps ( android, windows app, iOS) or simple javascript based App. If you planning to build a mobile App having cloud as backend, and you are planing to start directing building App, then it is perfect choice to using AMS. This provides CRUD operation as API having persistent entities. It uses SQL Azure as DB, and exposes API as REST. Following are some of advantages.

  1. CRUD operation with Cloud DB, access API from every where ( client side, server side).
  2. Social Signon integration, no need to write FB,TW API to integrate, just few config, that will make things work.
  3. Notification Hub integration – Send Push notification to any device ( android, iOS, windows ) without caring which format the device will accept.

Pusher : Pusher is a simple hosted API for quickly, easily and securely adding realtime bi-directional functionality via WebSockets to web and mobile apps, or any other Internet connected device. — http://pusher.com/docs . This has support for array of language support libraries.

To Build Real Time with AMS and Pusher – you need to have Azure and Pusher subscription.

What will be the end result – We will build a Collaborative TodoList manager, if multiple users opened same list, then anyone can add/remove/complete the task and it will be seamlessly visible to both.

How we will do this – We will use basic TodoList manager that azure provides and add RealTime functionality to this using Pusher.I will walk you through detailed step to implement this.

1. Login to Azure portal, create a Mobile Service with javascript backend.

2. Select that mobile service , click on Get Started, this will get you to following .

Azure_MS

3. Create todoitem table and download javascript todo App.

4. Create and Login to Pusher account. After loggin in, click on “New App”, it will create an App .You need to note down App ID, Key and Secret. Following is the screenshot for this.

Pusher_key

5. In Azure portal , select created Mobile Service, Click on Data, then select TodoItem table. Click on script, select insert operation. Then you should get following .

todoitem_script

Here you will get inbuilt function called “insert”. To integrate with Pusher, you have to include pusher library using –

var Pusher = require('pusher');

Then on every item insert operation we will push the details to Pusher using following code.

function publishItemCreatedEvent(item) {
 // Ideally these settings would be taken from config
 var pusher = new Pusher({
 appId: 'XXX',
 key: 'XXXXXXXXXXXXXXX',
 secret: 'XXXXXXXXXXXXXXX'
 });
 // Publish event on Pusher channel
 pusher.trigger( 'test_channel', 'OnInsert', item );
 }

Detailed explanation for above –  I have created a pusher instance using required credential such as appid, key, secret. Then i have triggered a message, with a channel name as “test_channel”, an event name as “OnInsert” and required object “item”.

Then we will invoke this function in success handler of insert operation. So that for every todo insert operation , pusher will know something. We will have to do the same steps for update, delete as well.

6. Open “index.html” from downloaded sample , mentioned in step # 3 & add following snippet to the HTML file.

<script src="http://js.pusher.com/2.2/pusher.min.js" type="text/javascript"></script>
 <script type="text/javascript">
 var pusher = new Pusher('PUSHER_KEY');
 var channel = pusher.subscribe('test_channel');
 channel.bind('OnInsert', function(data) {
      alert( "Hooray, Someone created task " + data.text);
      var newelem = $('<li>').attr('data-todoitem-id', data.id)
                             .append($('<button class="item-delete">Delete</button>'))
                             .append($('<input type="checkbox" class="item-complete">')
                             .prop('checked', false))
                             .append($('<div>')
                             .append($('<input class="item-text">')\                             .val(data.text)));
      $('#todo-items').fadeOut().append(newelem).fadeIn(100);
      $('#summary').html('<strong>' + $("#todo-items li").length + '</strong> item(s)');}
 );
 </script>

Detailed explanation for above : First, I have added pusher javascript reference. Then instantiated pusher by providing PUSHER_KEY , subscribed to channel named “test_channel”.

Finally, I have done binding for event “OnInsert” for the above channel, so that if there is insert ->Azure will send Puhser that new item added–>Pusher will intimate this HTML App , as this is subscriber to test_channel and listening to “OnInsert”.

I have uploaded this solution to pastebin, download that and replace with required key – (Pusher keys), and it should start working.

I have already published same article in MSDN  .

Azure Mobile Service with Pusher integration (Real Time APP)